How to create a Kubernetes Cluster via Kubeadm?

Topics Covered:
The Kubernetes Cluster Architecture
Building our Kubernetes Cluster
Kubeadm Installation and Deep Dive
Understanding Kubernetes Static Pods
Understanding CNI
Working with Kubectl context and kubeconfig
Working with Role Base Accessed Control
Maintaining the Cluster
Managing the certs and rotation
Upgrading the Cluster
Backing up the etcd
The Kubernetes Architecture
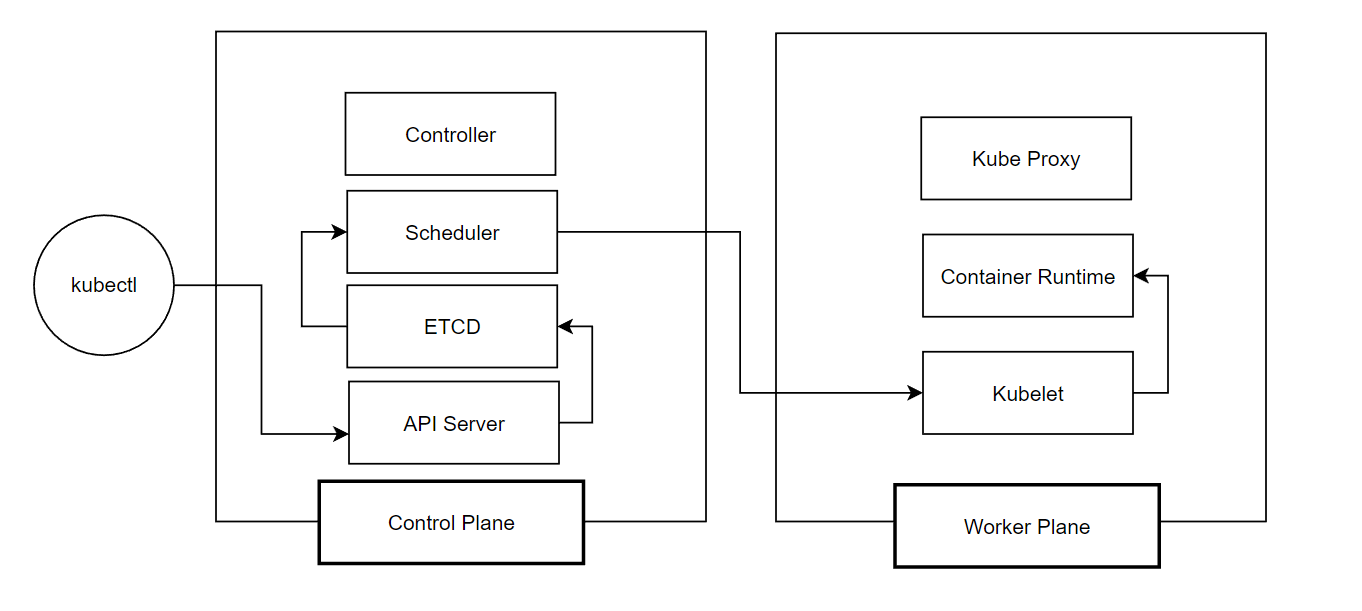
Control Plane
API Server - handles the request from client such as kubectl. Responsible for authentication and authorization of request.
Etcd - stores the state of the cluster and its configurations
Scheduler - schedule a pod to a node.
Controller - runs an infinite loop to maintain the desired state to the current state (e.g. cronjobs, daemonsets, replicasets)
Worker Plane
Kubelet - receives instruction from the scheduler then assigns the Pods to a Container Runtime
Container Runtime - allows a pod/containers to be runnable. Eg. docker, cri-o
Kubeproxy - forward the request to the appropriate service and endpoints.
Building Our Kubernetes Cluster
Kubernetes Installation via kubeadm
https://devopscube.com/setup-kubernetes-cluster-kubeadm/
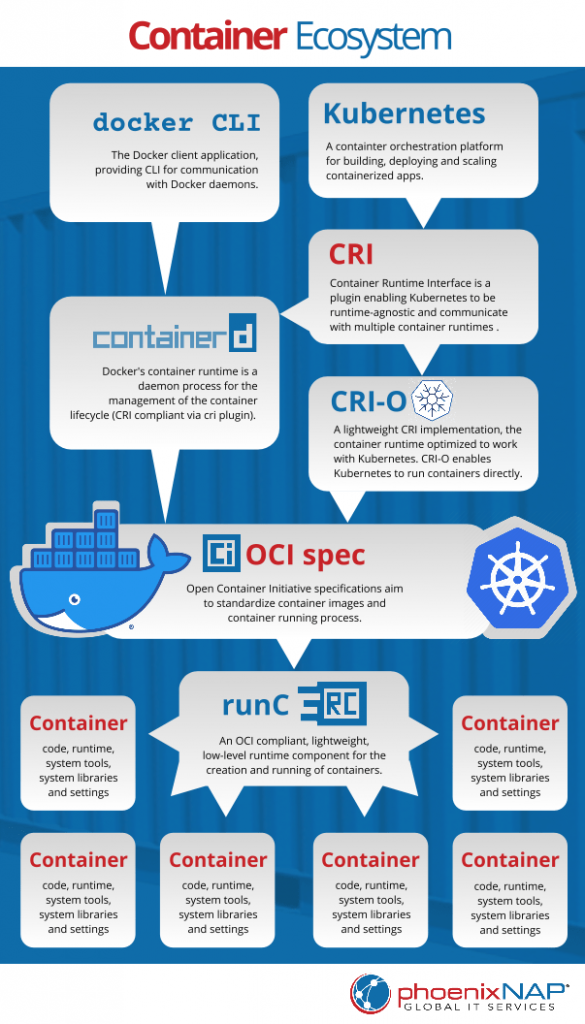
Good to know:
- Container runtime (either containerd or cri-o). It allows us to run container in host system. Check the image below how container runtime fits in the process. Image from https://phoenixnap.com
Understanding Kubernetes Static Pods

These are the pods that are created when boostrapping a cluster via kubeadm on the kube-system :
coredns - default dns for kubernetes. Provides service discovery and resolving dns names. DNS allows us to map a name to an IP. Allows use of external domain name.
kube-proxy - forward the request for appropriate endpoints and services. acts as a proxy, intercepts a traffic and redirect to specific service.
etcd - store the state of the cluster. Responsible for persisting configuration. (Stores endpoint)
apiserver - handles incoming requests from kubectl and others. Responsible for aut
scheduler - schedules pods to worker nodes
controller - runs an infinite loop to maintain the desired state to the current state (e.g. cronjobs, daemonsets, replicasets)
Understanding Kubernetes Networking Plugin
There are two main purpose of Kubernetes Networking plugin:
Makes sure the cluster have L3 Connectivity. (Routing traffic to different environments [both at pods and node levels] )
Network Policy enforcement
IPAM
Working with Kubectl context and kubeconfig
A Kubernetes context consists of a cluster, a namespace, and a user and is the configuration used to access a specific cluster and namespace
Allows use to give access to specific user
Steps:
- 1. Create a user
    adduser team-readonly
    passwd team-readonly
- 2. Create keypairs and certificate
    openssl genrsa -out team-readonly.key 2048

    openssl req -new -key team-readonly.key \
    -out team-readonly.csr -subj "/CN=team-readonly"

    sudo openssl x509 -req -in team-readonly.csr \
    -CA /etc/kubernetes/pki/ca.crt \
    -CAkey /etc/kubernetes/pki/ca.key \
    -CAcreateserial \
    -out team-readonly.crt -days 360
- 3. Update kubeconfig to include the keypair and certificate and
team-readonlyuser
    kubectl config set-credentials team-readonly \
    --client-certificate=team-readonly.crt \
    --client-key=team-readonly.key
- 4. Create a new context. Including user, namespace and cluster
    kubectl config set-context nontechnical-view \
    --cluster=kubernetes \
    --namespace=databases \
    --user=team-readonly
5. Add RBAC to the user
Create role / cluster role
Create rolebinding / cluster rolebinding
    kind: Role
    apiVersion: rbac.authorization.k8s.io/v1
    metadata:
      namespace: databases  # Same namespace as the one in the context
      name: team-readonly
    rules:
    - apiGroups: ["", "extensions", "apps"]
      resources: ["deployments", "replicasets", "pods", "nodes"]
      verbs: ["get", "list", "watch", "create", "update", "patch", "delete"]

    ---
    kind: RoleBinding
    apiVersion: rbac.authorization.k8s.io/v1
    metadata:
      name: team-readonly-role-binding
      namespace: databases
    subjects:
    - kind: User      # Here we say it's a normal user and not a service account
      name: team-readonly  # Here is where we define the user we created and defined in the context
      apiGroup: ""
    roleRef:
      kind: Role
      name: team-readonly
      apiGroup: ""
Check this: https://kubernetes.io/docs/reference/access-authn-authz/rbac/
Working with Role Base Accessed Control
Different users/groups == different level access. (cluster level, namespace level, resources, verbs access, particular application, api groups etc)
Roles and Cluster roles containes (resources, verbs) that is rolebinded (rolebinding) to users/groups/service accounts.
Elements:
Cluster role / role
Cluster rolebinding / rolebinding
Users Groups and Service Accounts
Maintaining the Cluster
Managing the certs and rotation
Upgrading the Cluster
Backing up the etcd
Those maintenance tasks above have different implementations, you can use a configuration management tool to automate the process.